Saturday, May 2, 2015

Test fit #2

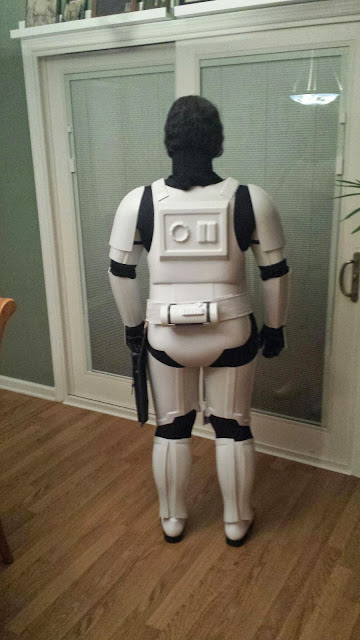
Test fit after thigh heating attempt and ankle trimming (the Son of Panda put my calves on and kept pulling them up to my knee. When attempts to explain "over the boot" went awry, I gave up. So, if you calculate the drop they should have, then they fit).

ALSO: when he put the TD on my belt, he asked me where the belt went and I said over the crack between the kidney and butt... he must have thought IN the crack. I didn't notice that until I saw the pictures. 

I walked around with just thighs and  calves on earlier and got very little interference.

I still need to shave a little off the inside of the wrists and inside of the bicep so the two parts stop whacking into each other, but I'm getting no pinch so it's probably because they are free flowing (no bicep to forearm connection). The forearms are tight on my arms so any more in there is gonna make it really tight.

We'll see what happens.

Holding pattern and update

I shaved a little more off the legs and tried to round the ovals of the church bell thighs.

Legs good.
Thighs went back to their shape.

Tried again with a heat gun but it got too hot to hold and went back to oval shape.

Tried to hold with a strap. I squeezed the oval into a round and tightened the strap. As soon as I let go, the oval shape came back. This was before I put in the hot water.  I tried just putting them in hot water then holding the shape with my hands and quickly putting in cold water and it held, after a few hours it went back to oval.

I'm done, it's not playing fair.

Squad leader says he will be done with the helmet soon. It is an ATA kit.

Wednesday, April 22, 2015

Sniper plate crack - white acrylic nail powder save

I don't know if the resizing did this or if they were there already.

Whatever the case, I called my nail tech Leo and got some white acrylic powder.

I'm better with nail fill than bondo, plus this way I won't have to paint the whole leg to match.


This will be folliwing the same procedure as repairing a cracked nail.

Sand and prep surface.


Glue reinforcement


Trim, sand, fill, sand, polish.

After wet sanding, it's ready to polish. 
I reinforced the inside with regular acrylic powder.

Monday, April 20, 2015

Test fit. Almost there.

Shoulder bell to chest plate space is the same in back. I didn't know I had such wide shoulders.
I'm knock-kneed as well. I will try to boil some water and reshape the church bell thighs. 
I also need to tuck the cod cup in a bit. It's sticking out and the thighs keep hitting it, and causes snaps to pop.
 Just about a 1/2 inch bend is all it needs.
I have to shave some off the forearms on the inside. 
The 11 dimples must stay, so I can't shave there.
Because this is an FX suit, the chest and back are long, there cannot be cut to eliminate the back and kidney overlapping. It has been raised on the shoulder as far as possible. The "O II" is as high as it can go. If I were to cut, it would interfere with the detail, and if I cut the kidney any more, it will not match up to the ab plate.
Aside from being put on a rack just to fit in this costume, this is how it has to be.
Need to lower that bottom plate...may shave some off the sides of the crotch, the cheek lift is still happening.

Ankles are also needing some trimming. I've been taking 1/4" off each pass, keeping the shape.
Back of thighs top-to-bottom is a fit, the oval shape of the knee area causes them to turn inward as I walk. There is no pinching when the rear cut-outs are in the proper place behind my knees... Hot water method coming up, definitely.
Also you can see the crotch on the butt plate, so cheeks push the whole thing up (industrial velcro is keeping the kidney and butt plate in their proper non-overlapping state).
Calves have a strip with velcro hook on both sides. The inside of the calves have loop velcro on both flaps. Gluing to one side failed. Someone with large calves posted a solution I followed on whitearmor.net.

Tuesday, April 14, 2015

Crooked Booty

Since the booty was crooked, I decided to fix and put in the proper snaps.


I'm still "trimming the fat" for my fat. The lines drawn are potential, not definite, trim points to eliminate "cheek push" (Cheeks push butt plate upward). I'm learning so much about my body flaws.

I have studied many proper approved armor posterior plates. I am staying within their design parameters.

I also saw many badly trimmed butt plates from the crappy sources so I know what NOT to do.

Ab plate extensions and snaps

Finally got those jacket snaps.
Attached expansion panels. They will be held on by the snaps/elastic.
Two womprats with one blast.

Shims and Cover Plates

Shims and Cover Plates

When I was separating the biceps, one didn't separate well.  I also had to extend both by 3/4" or so.

I repurposed some jigs I made a long time ago to bend the shim/covers.

Here are the biceps.


I'm doing the same with the thighs.
I used a mini setting iron to bend the one corner/end/bottom (the one on the left by the clamp).